Fairely Well Maid

Visit my store on Storenvy

Follow Me on Twitter

Thursday, June 30, 2011

11th century Bliaunt - At an impass

Well, I thought I would be posting that I finished my green Bliaunt today, but I've hit a major snag.  I got the gussets pinned and sewn up and the arms sewn up.  Tried it on and realized that the bobbin thread hadn't caught.  I spent two hours sewing and fighting with a jamming bobbin and cleaning and taking the bobbin casing apart only to have it all go up in flames.  Argh.

Good news is a guy in the town 15 minutes away fixes singers and gives free estimates.  I also have two wonderful friends who are going to loan me a sewing machine and to help me find a backup.

OK, next...

Wednesday, June 29, 2011

11th Century Bliaunt - Green - Day 1

I've changed a few things on this one.  It's a few inches longer and I have to put a back gusset in along with the two side gussets.  The side gussets are right triangles and the back one is two right triangles that I will sew together.  The fabric is a beautiful dark green cotton.  It is a bit shorter than 4 yards so I had to finagle just a bit.  Hey, no problem, it was free (thank you Kate).

Today I got all the pieces cut out.  Front and back pieces, two bell arms and four right triangle gussets.  The neckline is a bit more square.

I trimmed the neckline and then covered the back top with bias tape.  Then I sewed the shoulder seams together.  I turned the piece right side out and sewed the back neck down.  I then pinned on and sewed the sleeves onto the body.  Not bad considering all I intended to do way cut it out today.


Neckline

Back of the neck


Arm seam

Tuesday, June 28, 2011

11th Century Bliaunt - The Green one

I'm making another Bliaunt in dark green with a white/green thistle trim.  Here is the fabric and the trim.

Beaded snood - Day 2

Here is what it looks like so far.  What do you think?

Beaded snood

This is going to be a bit more of a project than my normal snood.  I can usually knock one of those off in, oh, about 2 days of causal work.  Not this one.  I have to string 436 gold glass beads on the crochet cotton before I can even start to crochet.  I use a needle threader to do this as I don't have a needle that will take the size 10 cotton and still go through the bead.

Yikes, 436 beads and 3 needle threaders later I'm done.  I'll start crocheting tomorrow.

Thursday, June 23, 2011

11th Century Bliaunt - Pictures of me in it

Front view
Side View

Side View
Arm

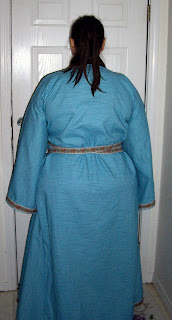
Back

11th Century Bliaunt - FINISHED

It's finished.  I am so happy with the way it came out.  I hemmed both sleeves and trimmed them.


I then hemmed the bottom.  I am thrilled that there was enough trim to do the bottom also.  I have so much left over that I made a cross over belt out of some of it.  I basically just took a nice long length and sewed the ends over.  i will probably add tassels to the ends. 


The next thing I need to complete this is a stomacher.  This is next.

Wednesday, June 22, 2011

11th Century Bliaunt - Day 3

It is fully sewn up.  I sewed the gussets to one side, went to pin it to the other side and, %$#@, ripped the gusset out because I sewed it on backwards.  Pinned it and sewed it on the right way.


Once I had the gussets sewn the correct way, I pinned the other side up.  It gets a little tricky so I start pinning from the underarm down to the hem.  I pinned both sides and tried it on.  That way, if anything needs to be adjusted, I can do it before it is all sewn up.  I tried it on over a tee shirt so I could judge what it would fit like with something underneath because I will be wearing it with a chemise.  It fit fine so I struggled out of it (yup, pins and all) and went to the sewing machine.  One side all sewn up, including the sleeve seam and that is when my bobbin empties.  I never have that kind of luck.  It usually happens mid seam :).  Re-wind the bobbin and sew the other side up.

Here is the bell sleeve

Here is the full length.
All that is left is hemming the sleeves, the bottom and trimming it out.

Onward and upward.

Tuesday, June 21, 2011

11th century Bliaunt - Day 2

Today was sew the body pieces together, trim out the neckline and sew on the sleeves day.  I wanted to do the side gussets too, but I over did it with visiting my SIL at the hospital then running five different errands in five different stores, so I was completely out of energy.  But, I was determined to do some sewing today.

The first thing I did was sew some thin grosgrain ribbon on the top of the back piece.  This will make the back of the neckline look cleaner and make it smoother.  I trimmed the front neckline.  It came out more V neck instead of scoop with a keyhole.  I definitely need more practice with necklines other than square.  I may redo the trimming later.

Once the shoulder seams were sewn, I pinned the back neckline down and stitched it down.  I think it looks clean and neat.

I then centered the top of the sleeves on the shoulder seams and pinned them down.  Back over to the sewing machine to stitch them up. 


This is as far as I got today.  Tomorrow I want to get the gussets in and stitch up the sides and the under sleeve.  Then I can try it on and hem the sleeves, then trim them.  Last will be hemming the bottom and seeing if I have enough trim to do the whole hem.  If not, I may do something down the sides.

Stay tuned.

Monday, June 20, 2011

...and so it begins - 11th Century Bliaunt

I'm making an 11th century Bliaunt.  This is a gown that is tight fitting on the top and flowing on the bottom.  It has long sleeves that starts tight at the top and bells out towards the bottom.  It has a shallow scoop neck with a keyhole at the middle.  It can also have a square neckline, but I'm going with the scoop.

I cut two pieces for the body, the front piece has the neckline cut out.  I cut two sleeves that will bell to about 18" at the end.  I also cut two gussets that will give the fullness starting at the waist to the end.  Traditionally, this style is made with a gusset in the front and back also, but I'm not that fond of sewing in gussets.  I need more practice before I'm completely comfortable with this.

I have enough fabric left over to make a belt.  I'm also making a stomacher of a blue brocade to go with it.  An 11th century stomacher is a very wide belt that laces up the back.  You can either wear a Bliaunt with a stomacher or a belt wrapped high under the bust, crossed in the back and tied in the front.  You can also wear both, which is my plan.

The trim will go around the neckline and the sleeves, and if I have enough around the hem.  Underneath this I will wear a chemise of blue/gray with tight sleeves all the way down.  I plan to eventually do some embroidery around the cuffs and neckline of the chemise.  We'll see about that.  A veil of the same fabric will round out the 11th century outfit.

The fabric is a cotton/linen blend and the trim is a tapestry type trim. 
Oh, by the way, I need to complete at least two Bliaunts and one, preferably two chemises and veils for the second weekend in July for GNEW (an SCA event which I will be vending and attending as a new SCA member).

Sunday, June 5, 2011

Bodice

As promised...pictures of Kat in her new bodice.  I'm really very proud of the way it came out.

Isn't she beautiful
Back view, as Kat fights with steal she wanted the effect of a skirt without needing to hike it up.

Friday, June 3, 2011

Bodice - Day 6

Have I told you how much I hate setting grommets.  So I have these two craft tools that I bought a while ago. One is a pliers like thing to set grommets, the other is a stapler like thing that is supposed to do the same. I have had to fight with these damn things every time I've needed them. The grommets I bought for the bodice came with this metal die and a hard plastic disk, so I tried that. BAM with the hammer and the grommet goes in like magic.

WHY DIDN'T I KNOW ABOUT THIS BEFORE?

WHY DIDN'T ONE OF MY FRIENDS TELL ME ABOUT THIS?

Am I now part of a secret club because I figured this out?

Oh, and where do I buy different sizes of these miracle tools?

I feel like I just stumbled on a $1000.00 bill.  I have fought so much with setting grommets that the thought of having to do it makes me a bit annoyed.  Now, No Problem, just give me a hammer and a sturdy table.

So I have to go get more grommets, because I don't have enough of the correct size for the straps.  I thought I had another pack. 

BTW anyone want a couple of slightly used grommet setting tools?  No, OK they go into the yard sale box.

Thursday, June 2, 2011

Bodice - day 5

All finished except for the grommets (have I told you how much I hate setting grommets).  I sewed the red outer fabric to the liner, taking care not to hit the bones when sewing along the outer edge.  I wanted to sew it in one clean sweep.  HA.  Because of the stiffening of the interfacing and the boning there was no way this was going to happen.  I did get the outer layer folded over the liner so the edges look clean.


As you can see at the very top, I had to slit the fabric a bit to get it around the curves. 

I then cut out the tails and liners for them.  I sewed them together and pinned them to the back, from the center out.  I stitched them on the bottom, then folded the red outer fabric over the bottom to make a clean edge on the front bottom and stitched straight across.  This also saved me from having to tack down, by hand, the seam made by the tails.

Please ignore the garbage bag behind the tails.  It's fabric that hasn't found a home yet.  Ah, fabric stashes.

So, all done except for the grommets (groan).

The reason for the tails:  My friend sword fights and wanted the effect of a skirt in the back without having to wear one and hitch it up.  When she comes to pick it up, there will be modeling pictures.

Wednesday, June 1, 2011

Bodice - day 4

I cut and pinned the red cotton to the liner.  I ironed the heavy duty interface onto the back and straps of the top.  Now I just have to sew it together and add the tails.

This is the liner pinned to the red fabric.


I had to notch the red to fit around the curve.
How it looks so far.